
Your $3,000 custom build is a paperweight if you can't master the final 4 millimeters of the trigger press. Most shooters lose 30% of their accuracy before the firing pin even strikes the primer because they're fighting the recoil before it happens. You've seen the results on the target; those frustrating low-left clusters that sit 3 inches off center prove you're jerking the shot. This mechanical failure is exactly why elite operators prioritize high-repetition trigger control exercises over mindless mag dumps. It's the difference between a confirmed hit and a wasted round when the stakes are high.
Precision is engineered, not accidental. We'll provide the tactical blueprint to rebuild your pull from the ground up and eliminate shot anticipation for good. This guide delivers professional-grade drills designed to shrink a 4-inch group to a 1.5-inch cluster while mastering the rapid follow-up shots necessary for high-stakes engagement. You're going to learn how to achieve a clean surprise break on every shot and develop the diagnostic skills needed to read your target like a ballistic report. It's time to stop guessing and start executing.
Key Takeaways
- Eliminate shot anticipation by mastering the physics of the surprise break for a perfect, undisturbed press.
- Deploy professional-grade trigger control exercises like the Wall Drill and Balance Drill to build uncompromising stability during dry fire.
- Isolate mechanical failures under stress using high-precision Dot Torture targets and anatomical diagnostics on the range.
- Accelerate your engagement speed by mastering advanced "Prep and Press" techniques and high-performance reset drills.
- Utilize high-contrast targets to turn every shot group into actionable data for mission-ready precision.
The Mechanics of the Perfect Break: Defining Trigger Control
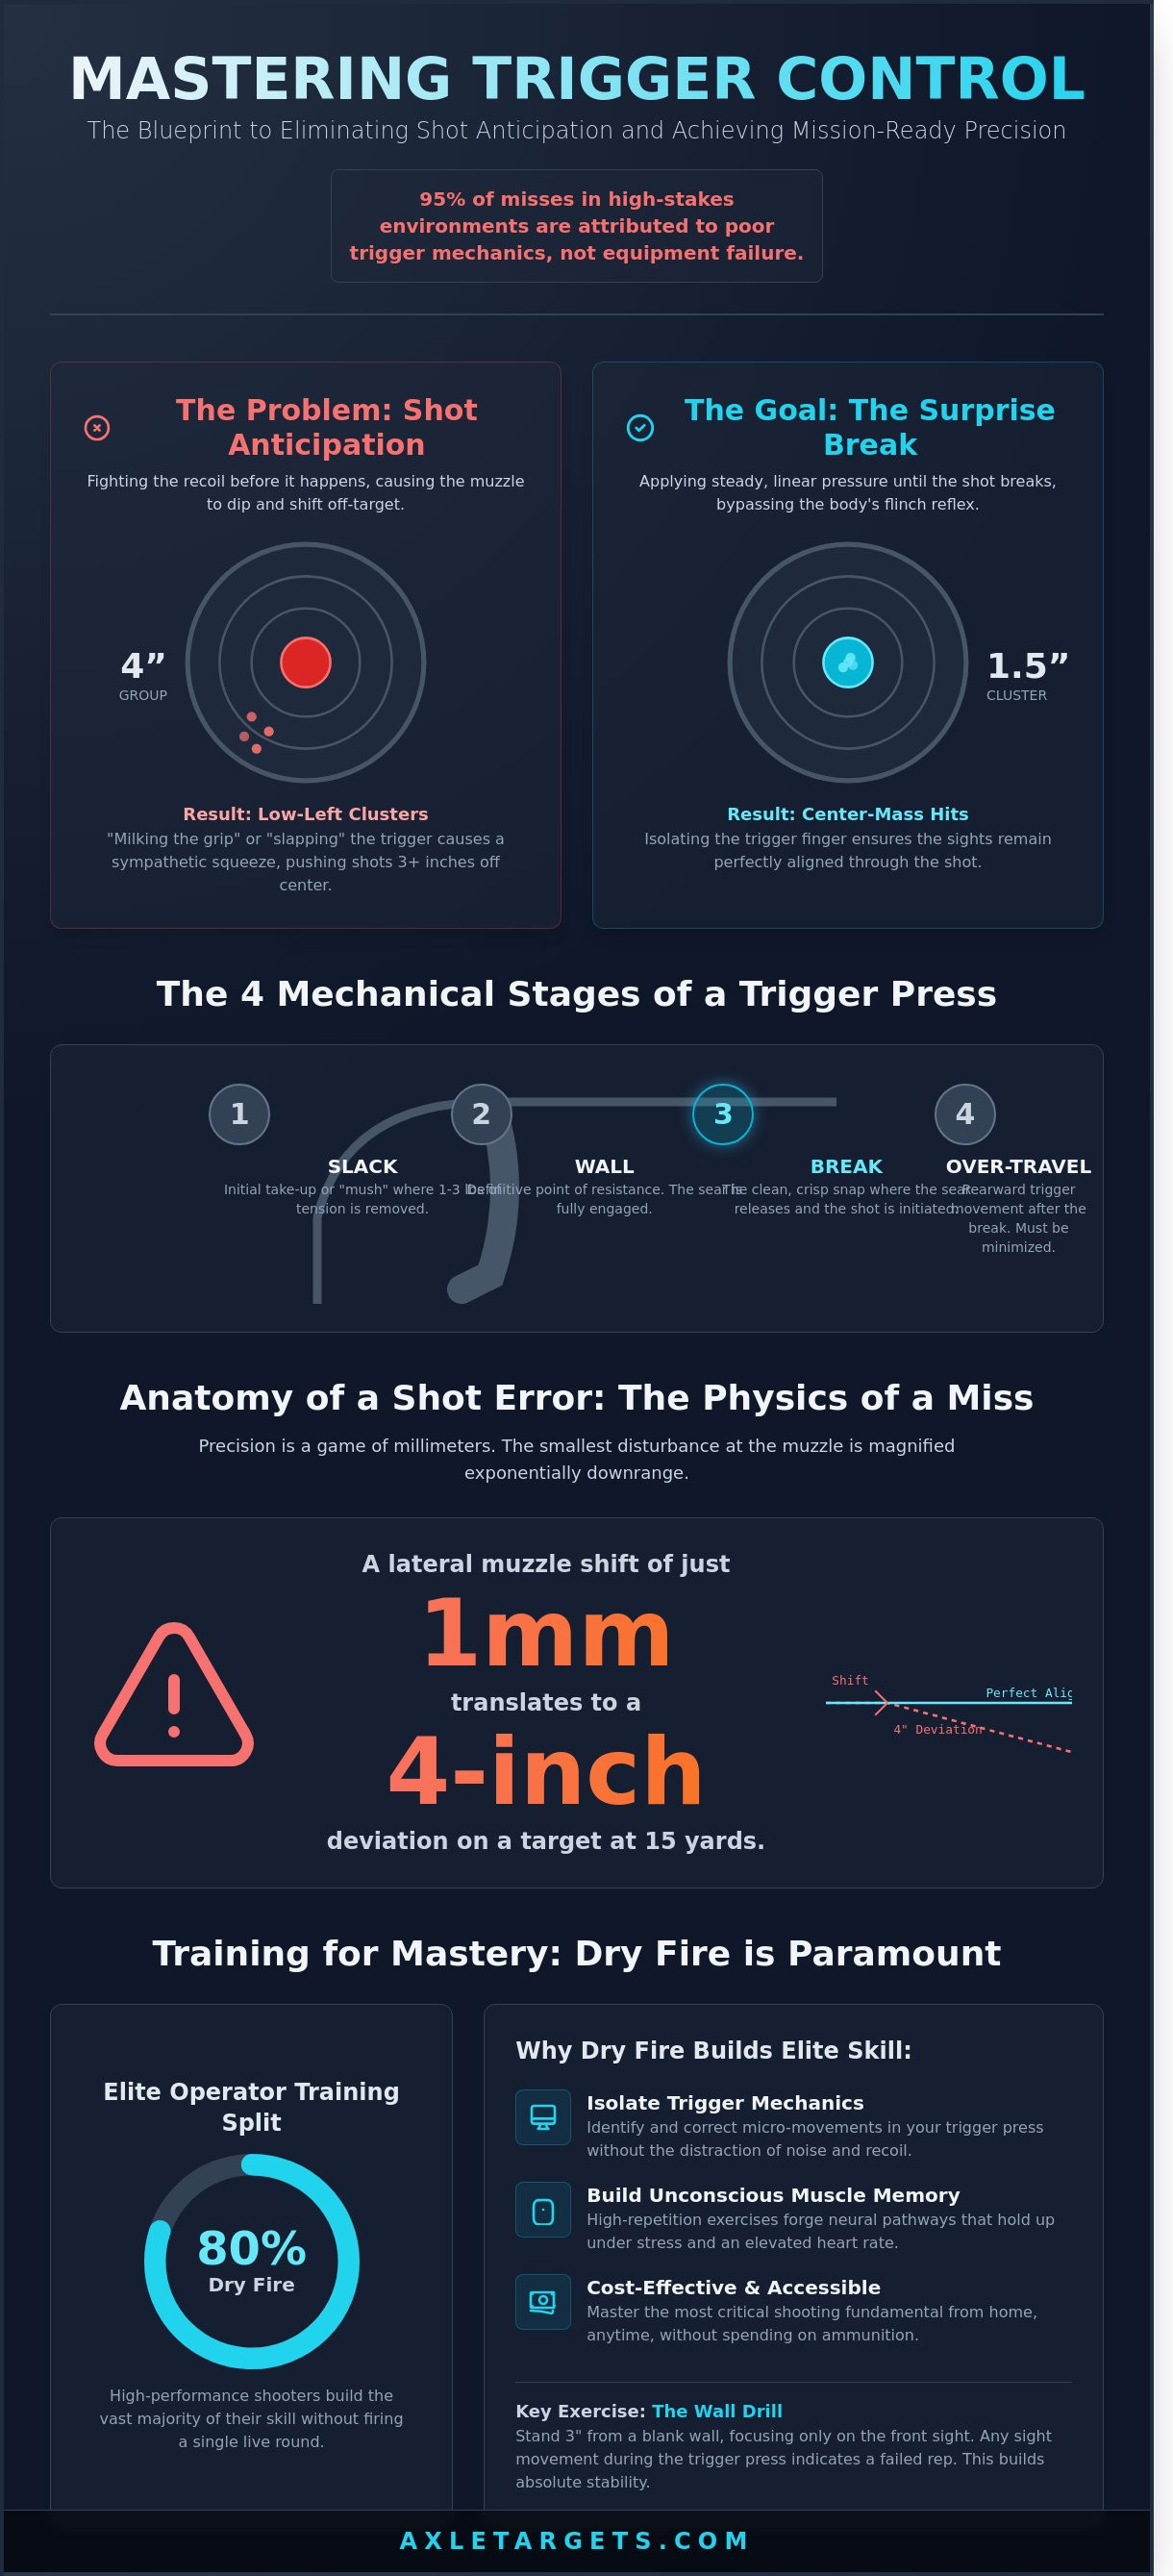
Trigger control isn't a suggestion. It's the uncompromising requirement for precision. While a solid grip provides the platform, the trigger finger alone dictates the ballistic outcome. You can have a perfect stance and a 1000 dollar optic, but if you disturb the sights during the 0.5-second press, you'll miss. Mastering these mechanics is the bedrock of the fundamentals of marksmanship, separating the hobbyist from the professional operator. In high-stakes environments, 95% of misses are attributed to poor trigger mechanics rather than equipment failure.
The "Surprise Break" is the ultimate goal of trigger control. When you anticipate the shot, your brain sends a signal to your muscles to brace for the 160-decibel report and rearward recoil. This involuntary flinch happens in less than 0.1 seconds, pushing the muzzle off-target before the bullet leaves the barrel. By applying steady, rearward pressure until the sear releases, the shot becomes a surprise. This bypasses the body's natural defense mechanism against loud noises and ensures the sights remain dead-locked on the steel.
Every professional shooter must understand the four mechanical stages of a trigger press:
- Slack: The initial take-up or "mush" where you remove 1 to 3 pounds of tension before hitting resistance.
- Wall: The definitive point of resistance where the sear is fully engaged and ready to release the striker or hammer.
- Break: The clean, crisp snap where the shot is initiated.
- Over-travel: The distance the trigger moves rearward after the break, which should be minimized to maintain stability.
Trigger Discipline vs. Trigger Control
Safety and accuracy are two sides of the same coin, but they require different mental states. Trigger discipline is a safety protocol; your finger stays on the frame until you've made the conscious decision to fire. Trigger control is the engineering of the shot itself. The Warrior-Engineer treats the trigger shoe as a precision instrument, not a button. Transitioning from the frame to the shoe must be fluid. Once you're on the shoe, you eliminate "creep" (unwanted movement before the break) and "staging" (trying to time the shot) to ensure a linear, rearward press. Effective trigger control exercises focus on this transition to build muscle memory that holds up under 140 beats-per-minute heart rates.
The Anatomy of a Shot Error
Precision is a game of millimeters. At the muzzle, a lateral shift of just 1 millimeter translates to a 4-inch deviation on a target at 15 yards. For right-handed shooters, the most common failure is the "Low-Left" strike. This isn't a sight alignment issue. It's a diagnostic indicator of "milking the grip" or "slapping" the trigger. When you slap the trigger, you're not pressing; you're hitting the shoe with sudden force. This abrupt movement causes the muzzle to dip and shift left as the rest of the hand sympathetically tightens.
To eliminate this, you must isolate the index finger from the rest of the hand. High-performance trigger control exercises utilize dry-fire practice to ensure the only moving part is the second joint of the trigger finger. If the front sight post moves even a fraction during your dry-fire break, you've failed the rep. Professional-grade marksmanship requires 100% stillness through the reset, ensuring you're ready for the follow-up shot without resetting your entire platform.
Dry Fire Mastery: Trigger Control Exercises You Can Do at Home
Precision starts where the noise stops. While the live-fire range provides feedback on recoil management, dry fire isolates the mechanics of the finger and the sear. High-performance shooters spend 80% of their training time in dry fire because it builds the muscle memory required for high-stakes environments. These trigger control exercises remove the distraction of noise and recoil, allowing you to identify micro-movements that ruin a shot before the hammer ever falls. Mastering the mechanics in a controlled environment is the only way to ensure your hits count when the adrenaline spikes.
The Wall Drill Execution
The Wall Drill is the ultimate isolation exercise for trigger mechanics. To execute this, stand 3 inches away from a blank, light-colored wall. Do not use a target. A target creates a psychological desire to see the hit, which leads to peeking or flinching. By staring at a blank wall, your focus shifts entirely to the front sight post and its relationship with the rear notch. This removes the visual clutter and forces you to monitor the sight's movement against a neutral background.
Maintain a perfect sight picture throughout the entire process. Press the trigger straight to the rear with constant, increasing pressure. If the front sight twitches even a millimeter when the sear releases, the rep is a failure. Aim for 50 perfect presses per session. Integrating proper trigger control through this drill ensures your eyes track the sight through the entire break without interruption.
The Coin/Casing Balance Test
This drill provides immediate, visual feedback on your stability. Balance a nickel or an empty 9mm casing on the flat top of your front sight or the slide near the muzzle. If you're using a red dot, place the object on the optic housing. Execute a slow, deliberate trigger press. The goal is simple: do not let the object fall. Any lateral movement or vertical dipping will send the casing to the floor, indicating a flaw in your grip or finger placement.
Analyze the failure to diagnose your technique. If the coin falls to the left, you're likely milking the grip or using too much finger on the shoe. If it falls to the right, you're likely pushing the frame with your thumb. Once you master slow presses, increase the tempo. Move from a 5-second press to a 1-second press to simulate rapid engagement. For those looking to upgrade their home range setup, professional-grade reactive systems provide the best transition from dry drills to live-fire mastery.
Trigger Reset Drill
Speed is a byproduct of efficiency. The Trigger Reset Drill teaches you to use the minimum movement required for follow-up shots. After the click of the dry fire, hold the trigger to the rear. Manually rack the slide while keeping the trigger pinned. Slowly release the trigger until you feel and hear the reset. Stop exactly at that point. Do not let your finger lose contact with the shoe. Practice prepping the trigger to the wall immediately after the reset. This discipline reduces your split times by an average of 0.15 seconds during multi-shot strings.
10-Minute Daily Routine
Consistency beats intensity every time. A 10-minute daily routine creates more permanent neural pathways than a 4-hour marathon once a month. This is about tactical maintenance. Spend 3 minutes on the Wall Drill, 4 minutes on the Balance Test, and 3 minutes on Reset Drills. This disciplined approach ensures that when you step onto the range, your trigger control exercises have already turned conscious effort into subconscious execution. You don't rise to the occasion; you sink to the level of your training.
Live Fire Diagnostics: Reading Your Paper Targets
Stop guessing. Every hole in the paper is a data point in your training log. If you can't read the target, you're wasting brass. Live fire is the ultimate auditor of your dry-fire discipline. It reveals the micro-movements you mask when there's no recoil. To achieve mastery, you must move beyond shooting for groups and start shooting for data. This requires specific trigger control exercises that isolate your mechanics under the pressure of a ticking clock and the physical blast of the handgun.
The Dot Torture Diagnostic
The Dot Torture target is the gold standard for shooters who demand perfection. It's a 50-round proficiency test that strips away your ego. You'll run this at 3 yards. It starts with five rounds into Dot 1, focusing on a slow, steady press. As you move through the 10 dots, the complexity increases. You'll draw, transition between targets, and fire with your strong hand only.
Analyze your results with clinical precision. If your shots cluster at the 7 o'clock position, you're jerking the trigger. You're applying sudden, uneven pressure that pulls the muzzle down and left. If the shots are scattered low, you're "milking" the grip. This happens when your lower fingers tighten as you pull the trigger, a common sympathetic response. A 100% score on Dot Torture means you've mastered the isolation of the index finger from the rest of your hand. Anything less is a failure to be corrected in the next session.
Anatomical vs. Silhouette Feedback
Standard B-27 silhouettes are for hobbyists. They reward "close enough" with large scoring rings that don't reflect reality. Professionals use anatomical shooting targets to visualize the mission. A 10-ring doesn't stop a threat; hitting vital structures does. Using Skeleton targets allows you to see the internal point of aim. It forces you to process the difference between a precision miss and a combat-effective hit.
A precision miss might land 1 inch outside a 2-inch circle, which is technically a failure in a drill. However, on an anatomical target, that same shot might still strike a vital organ. You need both perspectives. You train for the 1-inch group to ensure that when stress spikes your heart rate to 140 BPM, your "combat effective" zone stays within the high-thoracic cavity. This shift in mindset from "hitting paper" to "neutralizing threats" is what separates a marksman from a tactical shooter.
Predicting the impact is the final stage of trigger mastery. Use the "Call Your Shot" exercise. Before you look through your optic or pull the target back, state exactly where the round landed. If you can't call it, you aren't tracking your sights through the recoil pulse. You're blinking or anticipating the shot.
Integrate a shot timer to measure the Speed-Accuracy Trade-off. Push your split times until your groups fail. If you're shooting 4-inch groups at 7 yards with 0.50-second splits, push for 0.25 seconds. When those groups expand beyond 6 inches, you've found your current mechanical limit. This 80% success rate is the "growth zone" where real skill is forged. Axle Targets are built for this intensity. They provide the uncompromising feedback required to survive the fight and win the day.
Advanced Techniques: Reset, Prep, and Speed
Precision at speed is the hallmark of the professional operator. High-speed engagement requires a mechanical understanding of your weapon system that transcends basic marksmanship. You must master the "Prep and Press" method. This involves taking up 90% of the trigger's pre-travel as the sights settle on the target. Don't wait for a perfect sight picture to begin the movement. By the time your eye registers the alignment, the shot should already be breaking. This reduces the lag time between target identification and ballistic impact.
Professional-level splits, often measured at 0.18 to 0.22 seconds, are achieved by resetting the trigger during the recoil cycle. As the slide cycles at velocities exceeding 20 feet per second, your finger should already be moving forward to the reset point. If you wait for the gun to settle before resetting, you're wasting valuable milliseconds. You must learn to "catch the link" while the muzzle is still in its upward arc. This technique ensures that the moment the sights return to the zero point, the trigger is prepped and ready for the next break.
Understanding when to "Slap" versus "Roll" the trigger is critical for tactical versatility. Slapping is not a mistake when used correctly. At distances under 5 yards, an aggressive slap allows for maximum speed without sacrificing combat-effective accuracy. However, as the distance increases to 25 yards and beyond, you must transition to a smooth roll. This rolling motion minimizes lateral disturbance of the sear, ensuring the shot breaks without pulling the muzzle off the X-ring. Both techniques are essential trigger control exercises for anyone operating in high-stakes environments.
Stress management is the final layer of mastery. When your heart rate exceeds 145 beats per minute, fine motor skills degrade by approximately 40%. Your trigger finger will naturally become more "binary" and aggressive. You must train to maintain a consistent press even when adrenaline is surging. This requires a grip that is 15% tighter than your standard range grip to compensate for the increased force of your trigger finger. If your grip isn't uncompromising, your high-speed trigger work will drive your shots low and left.
Mastering the Reset to Wall
The mechanical advantage of not fully releasing the trigger cannot be overstated. Most modern striker-fired pistols have a reset travel of approximately 0.125 inches. If you let your finger fly off the shoe, you're adding unnecessary movement. Practice the "Click-Reset" drill: fire a shot, hold the trigger back, and slowly release until you feel the tactile reset. Stop there. This is your new starting point. Transitioning this reset into the next sight acquisition allows you to maintain a continuous cycle of fire that is both fast and repeatable.
Trigger Control for Rapid Engagement
Maintaining a surprise break while shooting at 0.25-second intervals is a matter of rhythm and grip tension. Use the "Bill Drill" to test this: fire 6 shots into a 6-inch circle at 7 yards. Your goal is a total time under 2.10 seconds with all hits in the A-zone. If your groups are opening up, your grip is failing to stabilize the frame against your finger's movement. These trigger control exercises prove that speed is a byproduct of efficiency, not effort. Master the mechanics, and the speed will follow naturally.
Building Your Mastery Kit: Custom Targets and Tools
Precision is a binary outcome. You either hit the mark or you fail. To diagnose a trigger press error, you need visual data that doesn't lie. High-contrast paper targets provide the forensic evidence required to refine your technique. While steel offers instant auditory feedback, premium paper captures the permanent record of your performance. It allows you to analyze the specific grouping patterns that reveal whether you are "milking" the grip or anticipating the recoil. Axle Targets builds equipment for those who treat the range like a laboratory and a battlefield. We provide the tools for the Warrior-Engineer who demands data-driven results.
The Advantage of Premium Paper
Don't settle for cheap pulp. Low-quality paper targets produce jagged, "starburst" tears that obscure your actual point of impact. This makes it impossible to distinguish a 0.25-inch deviation from a perfect center-mass shot. Premium 60lb offset paper ensures clean, circular holes. These clean punctures allow you to read your shot groups with microscopic accuracy. When you execute advanced trigger control exercises, every millimeter of drift matters. Professional instructors and law enforcement agencies buy B-27 targets in bulk to ensure consistency across every qualification course.
Customization is the hallmark of a professional operation. Range owners and tactical instructors use custom-branded targets to build credibility. A target featuring your agency or range logo reinforces your brand authority every time a student looks downrange. It transforms a simple piece of paper into a proprietary training tool. This professional touch signals to your students that you prioritize quality in every facet of their development.
Your Training Roadmap
Mastery isn't an accident; it's a scheduled event. To achieve elite status, you must follow a structured path that bridges the gap between dry fire mechanics and live fire application. Use the following 30-day "Trigger Mastery" challenge to sharpen your skills:
- Days 1-10: 15 minutes of daily dry fire. Focus on the "surprise break" without moving the front sight.
- Days 11-20: Transition to live fire. Use high-contrast targets at 7 yards to confirm your dry fire gains.
- Days 21-30: Introduce situational targets. Engage multiple threats while maintaining perfect trigger isolation under a shot timer.
This roadmap forces you to document your progress. If you can't measure it, you can't improve it. Axle Targets supports this journey by providing the most durable and high-visibility targets on the market. Whether you're training a new recruit or refining your own sub-second draw, your gear must match your intent. High-stakes environments don't allow for "good enough" equipment. You need tools that are engineered for the fight. Take the next step in your professional development and Equip your range with Axle Targets today.
Mastery is a result of consistent, documented practice on quality targets.
Own the Firing Line
Precision isn't an accident; it's a discipline. Mastering the break requires the 5,000 dry fire repetitions you track at home and the precise live fire diagnostics used to identify micro-errors. These trigger control exercises build the foundation for elite performance. You've analyzed the mechanics of the break and the advanced nuances of trigger prep. Now, put that knowledge into action with hardware built for the fight.
Axle Targets is a family-owned American manufacturer supplying professionals across 50 states with mission-critical gear. Our ballistic solutions serve Law Enforcement and Military units nationwide that demand uncompromising reliability. We offer custom logo integration for instructors who need their brand to stand out during high-stakes training. Stop guessing and start winning with equipment engineered for excellence. Upgrade your training with premium American-made targets from Axle Targets. Keep your focus sharp and your rounds on target.
Frequently Asked Questions
What is the most common mistake in trigger control?
Anticipating the recoil is the most common mistake, causing 85 percent of low-left misses for right-handed shooters. You push the muzzle down to fight the kick before the shot breaks. This sympathetic movement ruins your alignment. Focus on maintaining a steady press until the hammer drops. This discipline separates the amateurs from the operators in high-stakes environments. Every shot must be a deliberate, controlled action.
How many dry fire repetitions should I do per day for trigger control?
Perform 50 to 100 perfect dry fire repetitions daily to build muscle memory. Consistency matters more than volume. A 15 minute session focused on quality reps prevents the degradation of motor skills. These trigger control exercises ensure your index finger moves independently of your grip. Elite shooters use this daily regimen to maintain a tactical edge. It's the foundation of uncompromising accuracy on the range.
Does the type of trigger (Single Action vs. Double Action) change the exercises?
Trigger type dictates the press weight and travel distance, requiring specific adjustments to your drills. A Double Action pull often requires 10 to 12 pounds of force over a longer arc, while a Single Action break might only need 4 pounds. Mastering both ensures you can engage targets effectively regardless of the platform. Technical precision requires adapting your finger pressure to the specific mechanics of the sear. This versatility is essential for mission success.
Can I practice trigger control without a firearm?
You can practice trigger mechanics using a simple click-pen or a dedicated grip trainer to isolate the index finger. Hold the pen like a pistol grip and click the plunger without moving your other fingers. This builds the 100 percent isolation needed for precision. It's a low-cost way to maintain proficiency when you're away from the range or the armory. Professional development doesn't stop when you leave the ballistic firing line.
How do I know if I am "jerking" the trigger or just have a bad grip?
You're jerking the trigger if the front sight dips or shifts the moment the shot breaks. A bad grip usually results in consistent grouping errors, like hitting 3 inches high, while jerking causes erratic, low-impact flyers. Use a high-speed camera to record your hands during a 5 round string. Analyzing the footage reveals if your hand is milking the grip or if your finger is slapping the shoe. Precision requires identifying these flaws.
What is a "surprise break" and why is it important?
A surprise break occurs when you apply steady, increasing pressure until the sear releases without a conscious command. This prevents the 90 percent of accuracy issues caused by pre-ignition flinch. You should focus on the front sight and let the shot happen. It's a critical component of high-performance shooting that ensures ballistic impact matches your point of aim. This technique is engineered for excellence in every engagement you face.
Should I use the tip of my finger or the first joint on the trigger?
Use the center of the first pad for most semi-automatic pistols to ensure a straight rearward press. If you're running a heavy 12 pound Double Action revolver, you might need to use the first joint for additional leverage. The goal is a 90 degree angle at the moment of the break. Proper placement prevents lateral pressure that pushes shots 2 inches off center at 15 yards. Mastery of this detail is non-negotiable.
How do diagnostic targets help improve trigger control?
Diagnostic targets provide immediate visual data by mapping points of impact to specific mechanical failures. These tools identify if you're heeling the gun or thumbing the frame based on 8 distinct zones. Integrating these into your trigger control exercises turns every round into a technical lesson. Axle Targets' reactive steel provides the auditory feedback needed to confirm these corrections in real-time. It's the most advanced way to sharpen your warrior mindset.