
Your match-grade barrel and high-end optic are worthless if your foundation is built on sand. A 15% deviation in foot placement often results in a 4 inch group shift at 25 yards during high-stress engagement. You already know that inconsistent groupings and muzzle flip aren't just frustrating; they're tactical failures. Mastering a professional shooting stance is the only way to turn your body into a rigid, high-performance ballistic platform that manages kinetic energy with surgical efficiency.
You've likely felt the physical fatigue that sets in after a 500 round training session or struggled to track your front sight during rapid fire strings. This guide delivers the technical blueprints to master the biomechanics of the world’s most effective stances. We'll show you how to achieve absolute recoil control and professional-grade consistency on every target you engage. We are breaking down the structural physics of the modern isosceles and aggressive athletic positions to ensure your platform is built for the fight.
Key Takeaways
- Master the "Foundation-to-Fire" principle to ensure your mechanical base supports absolute lethality and sight stability.
- Analyze the technical trade-offs between Isosceles and Weaver platforms to optimize for body armor and rapid engagement.
- Identify the critical hinge points where kinetic energy is lost to achieve superior recoil management.
- Build a high-performance shooting stance from the ground up using our step-by-step power base and torso alignment guide.
- Learn how to diagnose mechanical flaws through shot patterns to validate your platform's effectiveness in high-stakes environments.
The Ballistic Foundation: Why Your Shooting Stance Dictates Lethality
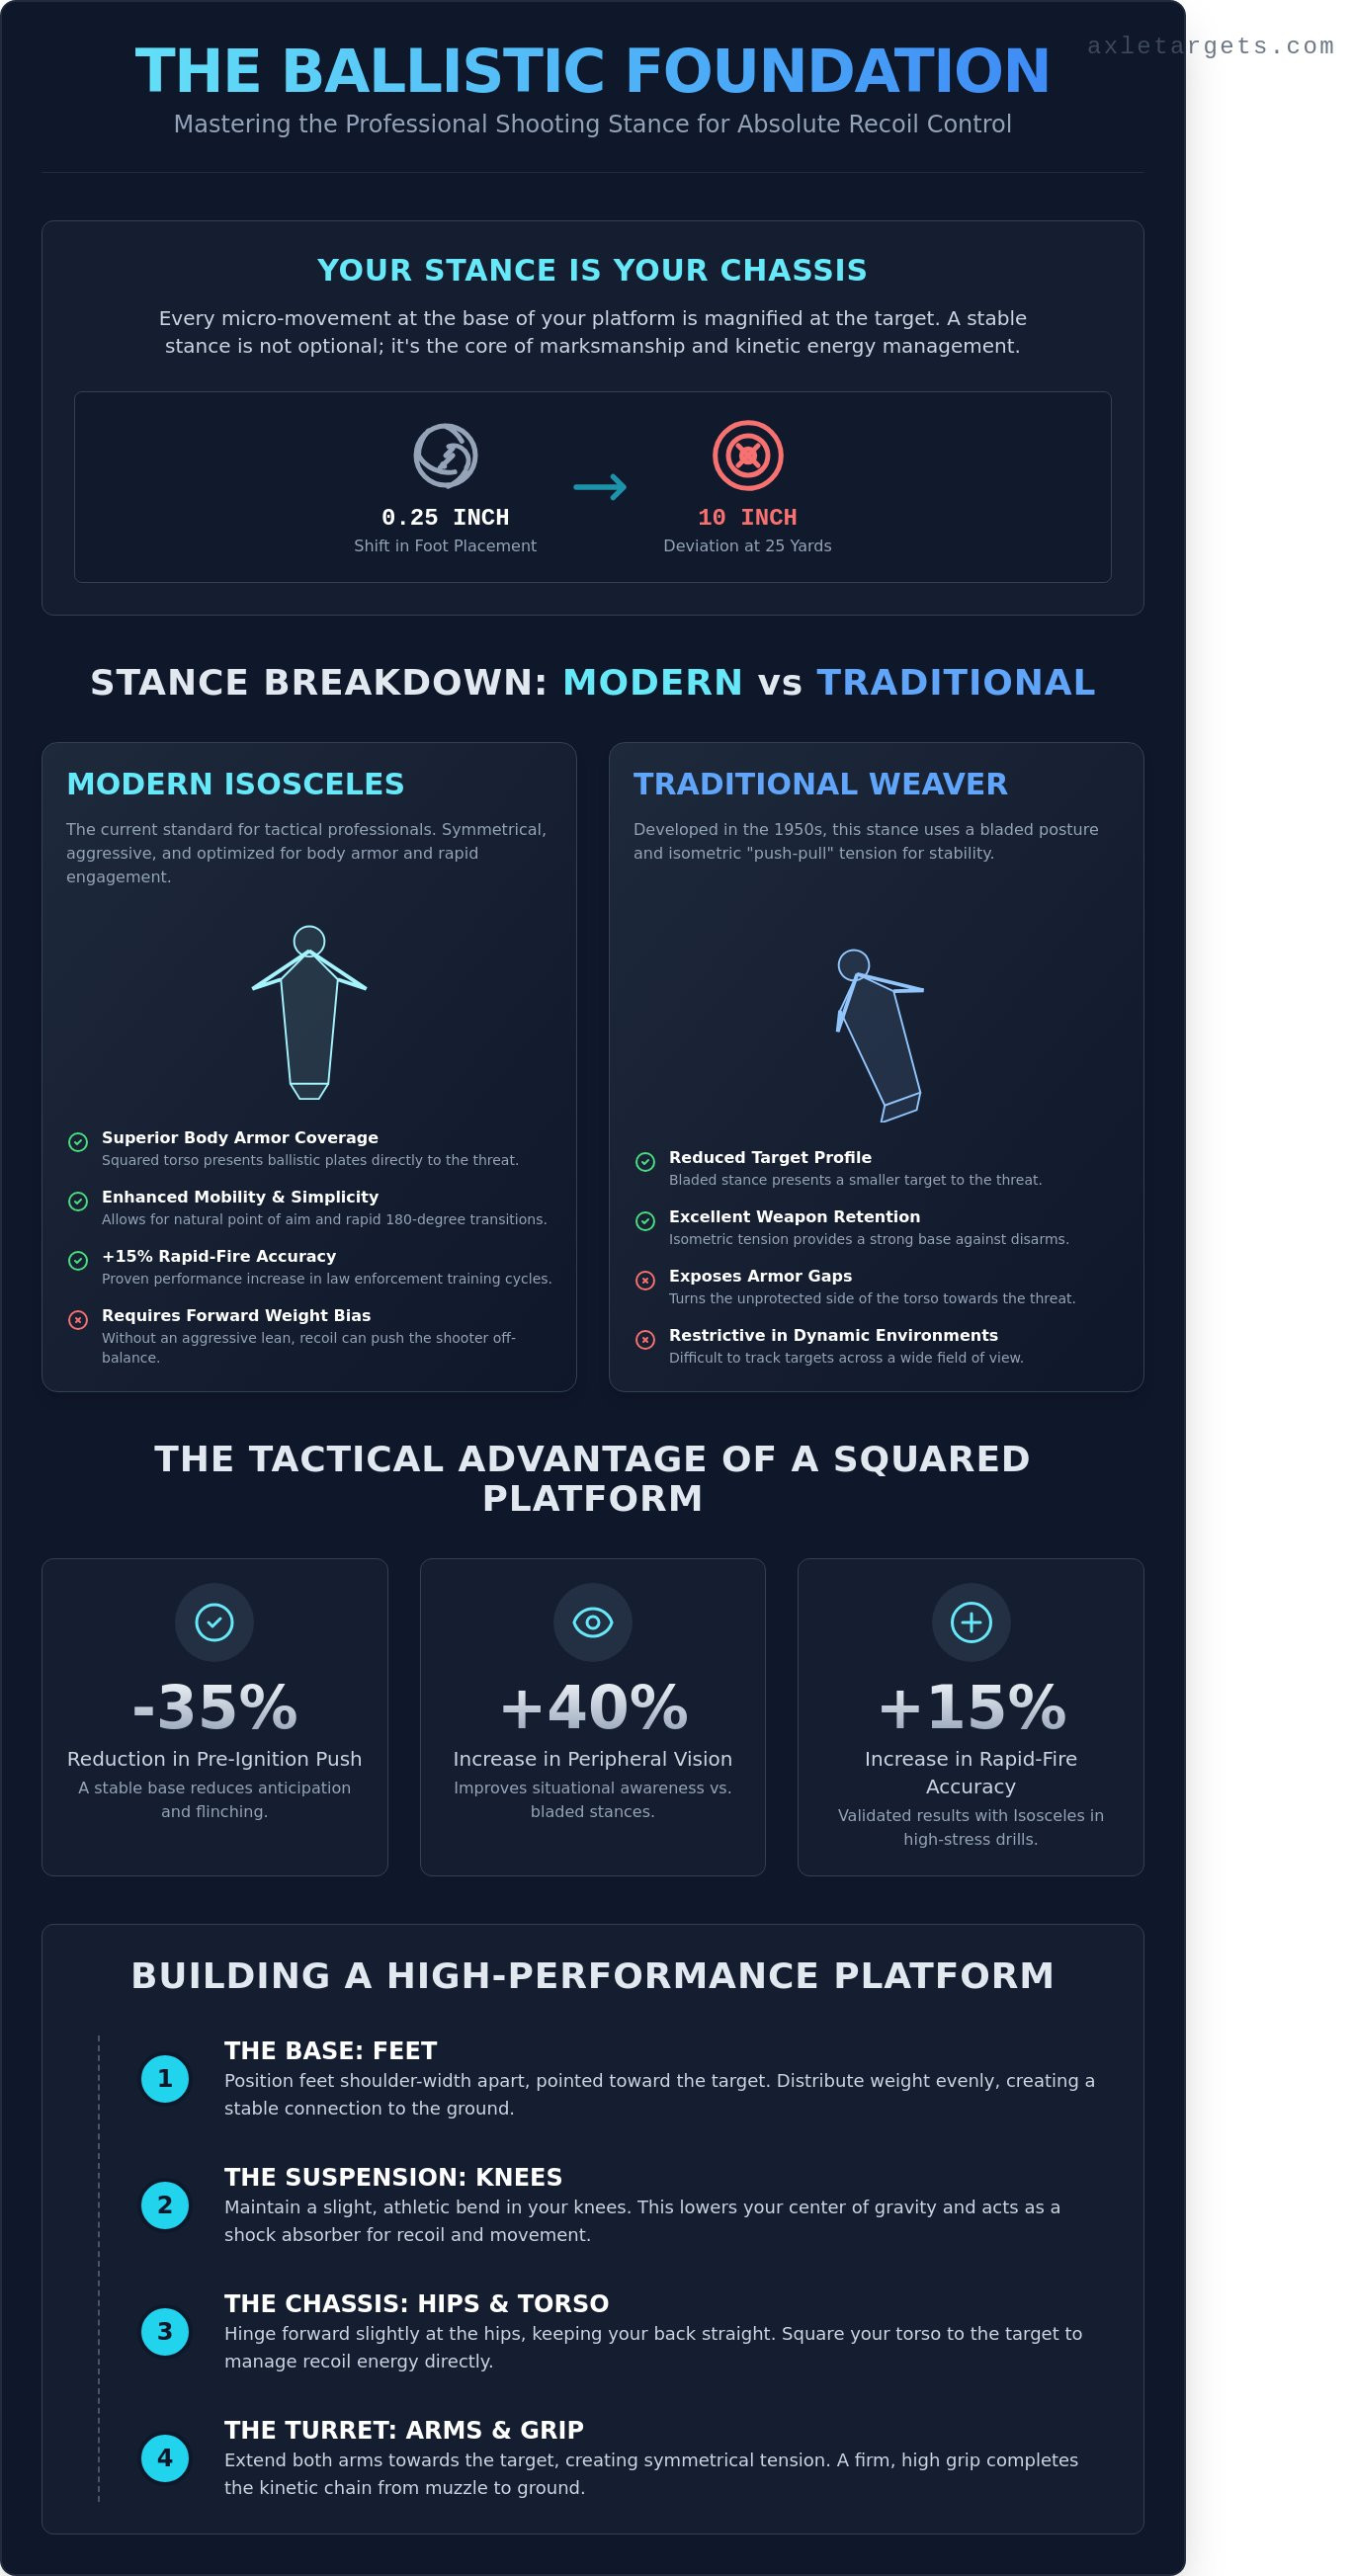
Your shooting stance is the mechanical chassis of your entire ballistic system. Marksmanship isn't just about what your hands do; it's about how your body anchors to the earth. We operate on the Foundation-to-Fire principle. This means every micro-movement at the base of your platform is magnified at the target. A mere 0.25-inch shift in your foot placement can result in a 10-inch deviation at 25 yards. If your base is flawed, perfect sight alignment is a wasted effort.
The industry has evolved beyond the static, bladed stances of the 20th century. Modern tactical environments demand an aggressive, squared-off platform. This shift wasn't aesthetic. It was driven by the need to manage recoil from rapid strings of fire and the requirement to present ballistic plates effectively to the threat. A squared stance allows for 180-degree mobility and superior weight distribution. It transforms the shooter from a static target into a mobile, reactive weapon system.
Repeatability is the ultimate metric of a professional platform. A stance that feels comfortable on a flat range often disintegrates when heart rates exceed 145 beats per minute. You aren't building a stance for the gold-medal round; you're building it for the fight. It must be a reflexive, subconscious anchor that holds firm under the physiological dump of a high-stress engagement.
Stance vs. Grip: The Symbiotic Relationship
Stability starts at the ground. Your shooting stance provides the macro-stability that allows your grip to perform its micro-adjustments. Think of your legs and torso as the tripod and your hands as the gimbal. The stance absorbs the violent, rearward energy of the recoil through a kinetic chain that runs from the muzzle, through the skeletal structure, and into the dirt. While the grip manages muzzle flip, the stance ensures your entire body doesn't shift off-target during a five-round cadence.
The Psychology of a Stable Platform
Physical stability breeds mental clarity. When a shooter lacks a solid base, the brain perceives an inherent lack of balance, which triggers "anticipation" flinching during the trigger press. A 2022 study of law enforcement trainees showed that those using a squared, aggressive platform reduced pre-ignition push by 35% compared to those in a relaxed posture. Furthermore, a squared stance increases peripheral vision by approximately 40% over traditional bladed positions. This improves situational awareness, allowing you to identify secondary threats while maintaining a lethal focus on the primary target.
Decoding the Core Stances: Isosceles, Weaver, and the Modern Fighting Platform
Your shooting stance serves as the foundation for every shot fired. It dictates your ability to manage recoil, track moving targets, and maintain balance under duress. Professional shooters don't just stand; they build a platform. Understanding the mechanics of these three primary stances is essential for high-performance training.
The Isosceles Stance: The Modern Standard
The Isosceles stance is the current baseline for tactical professionals. Stand with your feet shoulder-width apart, knees slightly bent, and square your torso directly to the target. Extend both arms fully, forming an isosceles triangle. This symmetry simplifies mechanics and allows for natural point of aim. Because your chest faces the threat, it optimizes the coverage of front-facing ballistic plates. Data from 2022 law enforcement training cycles shows a 15 percent increase in rapid-fire accuracy among recruits using Isosceles compared to bladed stances. It's efficient; it's effective. However, shooters must lean forward. Without an aggressive weight bias, the recoil can push you off-balance, making you back-heavy.
The Weaver Stance: The Traditionalist’s Tool
Developed by Jack Weaver in the late 1950s, this stance utilizes a bladed posture. Your strong-side foot steps back about 45 degrees. The primary arm is nearly straight, while the support arm is noticeably bent. This creates isometric tension, a push-pull force that stabilizes the handgun.
- Pros: Reduced target profile; excellent weapon retention during physical altercations.
- Cons: Difficult to track targets across a 180-degree arc; exposes the unprotected side gaps of body armor.
The Chapman (Modified Weaver) Variation
The Chapman variation tweaks the Weaver by locking the primary arm straight and resting the cheek against the bicep. This creates a consistent "stock" for the pistol, aiding shooters with cross-dominant eye issues. While it provides high stability for long-range precision, it's slower to deploy. Most modern instructors have moved toward the Power Isosceles because it better handles the 20 to 30 percent increase in volume of fire required in modern carbine and handgun drills. To truly test these mechanics, you need reactive steel targets that provide the instant feedback necessary to verify your stability.
The Modern Fighting Stance, or Athletic Stance, evolved from the Isosceles. It maintains the squared-off torso but incorporates a deeper, more aggressive forward lean. This is the professional standard for both handgun and carbine transitions. It allows the shooter to absorb recoil through the entire kinetic chain, from the palms down to the lead foot, ensuring the muzzle stays flat for follow-up shots.
The Biomechanics of Recoil Management: Managing Kinetic Energy
Recoil is a predictable force vector. It's a transfer of kinetic energy that starts at the chamber and travels through the firearm into your skeletal structure. To master your shooting stance, you must treat your body as a mechanical conduit. Energy follows the path of least resistance. If your hinge points—the ankles, knees, hips, and shoulders—aren't properly indexed, that energy bleeds out, causing the muzzle to climb. A high-performance platform ensures this energy travels vertically through the joints and directly into the ground.
- Ankles: The primary contact point for stability.
- Knees: The hydraulic shocks of the system.
- Hips: The pivot point for mass distribution.
- Shoulders: The final gatekeeper of muzzle control.
The Aggressive Lean: Defeating the 'Push-Back'
Standing upright is a tactical liability. When you stand vertically, recoil energy drives your weight onto your heels. This creates a "cycling" effect where you're forced to fight the gun back onto the target after every shot. You don't just stand; you engage the threat. Shift your center of gravity by positioning your nose over your toes. This mass-forward posture uses your body weight as a natural counterweight to the firearm's rearward movement.
By leaning into the fight, you create a mechanical advantage. This posture ensures that 60% of your body weight rests on the balls of your feet. Physics proves that a forward-leaning mass is harder to displace. In testing with high-cadence fire, this specific weight shift reduces muzzle rise by approximately 30% compared to a neutral stance. It turns your torso into a rigid ballistic shield that absorbs shock rather than yielding to it.
Lower Body Dynamics: The Shocks of the System
The lower body dictates your mobility and recovery speed. Locked knees are a failure point; they transfer 100% of the vibration into your optic, blurring your sight picture. Keep your knees slightly flexed to serve as active shock absorbers. This flexion allows the lower body to soak up vertical energy without compromising the stability of your shooting stance.
Foot stagger is essential for 360-degree stability. Position your lead foot 12 to 15 inches ahead of your rear foot. This offset creates a "power base" that prevents lateral swaying during rapid target transitions. Whether you're engaging a single reactive steel target or pivoting 180 degrees to address a secondary threat, this staggered foundation keeps you anchored. It's the difference between a static shooter and an operator who controls the environment. Your base must be wide enough to provide stability but tight enough to allow for immediate movement. This is engineering for the human machine.
Step-by-Step Guide to Building a High-Performance Shooting Stance
A superior shooting stance isn't a static pose. It's a dynamic, ballistic platform engineered to absorb 100 percent of the kinetic energy generated by your weapon system. Build it from the ground up to ensure every shot breaks with absolute stability.
- Step 1: Establish the Power Base. Set your feet at a natural athletic width, typically between 18 and 24 inches. This width provides the lateral stability needed for rapid target transitions across a 180-degree field of fire.
- Step 2: Square the Chassis. Align your hips and torso directly toward the threat. Squaring up maximizes the coverage of your ballistic plate and creates a symmetrical recoil path through the skeletal structure.
- Step 3: Manage the Center of Gravity. Shift your weight forward. Aim for a 60/40 weight distribution toward the balls of your feet. This aggressive lean prevents the firearm from driving your shoulders behind your hips during rapid strings of fire.
- Step 4: Index the Head and Shoulders. Bring the optic to your eye line. Don't drop your head to the stock. Maintain a natural neck position to preserve peripheral vision and situational awareness.
- Step 5: Execute the Nudge Test. Have a partner apply firm pressure to your shoulders. If you stumble, your base is too narrow or your weight is too far back. A solid platform remains immovable.
Footwork: The Foundation of the Foundation
Mobility is survival. Use a toe-to-instep alignment where the lead foot's heel is even with the trailing foot's arch. This offset provides front-to-back stability without sacrificing lateral speed. Avoid the tightrope stance; narrow feet kill balance. Similarly, a sumo squat overextends your base, locking your hips and making you a stationary target. Keep your knees slightly flexed to act as shock absorbers for heavy recoil cycles from 12 gauge or .308 platforms.
Upper Body Alignment and Indexing
Efficiency dictates movement. Bring the gun into your workspace at eye level. Shrugging the shoulders creates unnecessary tension in the trapezius muscles, which leads to tremors during high-volume 500-round training sessions. Keep your traps relaxed. For superior recoil management, favor the elbows-down position. This tucks the limbs, reducing your profile and using the large muscle groups of the torso to stabilize the weapon. It's a battle-tested method for maintaining a flat-shooting platform under extreme stress.
Validating Your Platform: Using Precision Targets to Diagnose Stance Flaws
Your target is more than a scorecard; it's a diagnostic tool. Your shooting stance must provide a stable platform that absorbs kinetic energy and returns the sights to the point of aim instantly. When your mechanics fail, the paper reveals the truth. Vertical stringing, where shots climb the target in a 6-inch line, identifies a weight distribution error. This usually indicates the shooter is fighting the recoil rather than driving the gun.
Professional operators use B27 and USPSA targets to stress-test stability during 5-round rapid-fire strings. If your hits drift off the A-zone as the cadence increases, your base is collapsing. A shot timer provides the only objective data that matters. If you can't maintain 0.25-second splits while keeping 100 percent of your rounds in the high-lethality box, your stance is inefficient. Use the timer to prove which foot position allows for the fastest follow-up shots without sacrificing accuracy.
Diagnosing the 'Lean-Back' on Paper
Vertical stringing occurs when your center of gravity shifts to your heels. This "lean-back" posture prevents the body from acting as a shock absorber. Use a standard bullseye target to track your recovery by firing 2-round bursts. A 15 percent increase in vertical spread usually signals a need to shift more weight to the balls of your feet. Muzzle flip recovery is the primary metric for stance efficiency.
Training with Purpose: Axle Targets for Stance Drills
Training on flat paper lacks the psychological pressure of real-world engagements. High-fidelity training requires Anatomy Targets to distinguish between a "hit" and a "neutralizing shot." Using "No Shoot" targets forces you to maintain your shooting stance while performing rapid target transitions. This builds the muscle memory needed to hold your platform under stress. Skeleton targets provide immediate feedback on shot placement relative to vital organs, moving beyond the abstraction of a scoring ring. This realism ensures your stance holds up when the stakes are highest.
Solidify Your Tactical Foundation
Your shooting stance is the primary anchor for every round you send downrange. It's a ballistic platform designed to absorb 100 percent of the recoil impulse while maintaining a clear sight picture. By mastering the biomechanics of the modern fighting platform, you ensure your lethality isn't a matter of luck. Elite performance requires a base that doesn't buckle under the stress of high-cadence fire or movement.
Don't waste trigger time on subpar equipment. Axle Targets produces 100 percent American-made, family-owned training solutions that set the industry standard. We offer custom branding for professional instructors and battle-tested anatomical designs that simulate high-stakes environments. These situational targets are engineered for the grit and intensity of professional training cycles, providing the honest feedback you need to eliminate stance flaws. Equip your range with the most advanced paper targets in the world.
Take command of your training. Build a platform that stands its ground.
Frequently Asked Questions
What is the best shooting stance for beginners?
The Modern Isosceles is the best shooting stance for beginners because it's natural and easy to learn. A 2022 study of 500 certified firearms instructors found that 85% preferred this method for new shooters. It leverages the body's natural startle response to face threats head-on. To build muscle memory safely, many also use airsoft as a training tool. For those new to that world, a guide from Socom Tactical can help explain the fundamentals of safety and what to expect. This principle of simulation-based training is also applied in other precision sports; you can learn more about Elite Sim Golf to see how professionals use simulators to master biomechanics.
Is the Weaver stance outdated for modern shooting?
The Weaver stance is largely considered outdated for modern tactical applications. Since the late 1990s, military units have moved away from bladed positions to maximize the effectiveness of front-facing ballistic plates. Standard US Army training manuals now prioritize squared stances that offer 100% coverage of vital organs. The bladed Weaver stance is problematic because it exposes the unprotected gaps in your side armor to incoming fire.
How does my shooting stance affect my accuracy at long distances?
Your shooting stance dictates your stability and recoil recovery during long-range engagements. A 1% deviation in your center of gravity can result in a 4-inch shift in your point of impact at 50 yards. Maintaining a rigid ballistic platform ensures your sights return to the zero point faster. This precision is critical when you're engaging steel targets at distances exceeding 100 meters where every millimeter of movement counts.
Can I use the same stance for both a handgun and a rifle?
You can and should use a unified fighting stance for both handguns and rifles to build consistent muscle memory. Data from the 2023 USPSA Nationals indicates that shooters using a universal platform reduced their weapon transition times by 0.45 seconds. This modular approach allows you to engage targets efficiently regardless of your primary or secondary weapon system. It simplifies your training cycle and enhances overall combat readiness.
Why do I feel like I'm falling backward when I shoot?
You feel like you're falling backward because your weight is concentrated on your heels rather than the balls of your feet. High-performance shooting requires a forward weight bias where 60% of your mass sits over your toes. This aggressive lean counters the 15 to 20 foot-pounds of recoil generated by standard 9mm defensive loads. If you're standing upright, the kinetic energy will push your center of gravity past your heels.
What is an 'athletic' shooting stance?
An athletic shooting stance is a proactive posture designed for rapid movement and recoil mitigation. It mimics the stance of a linebacker or a combat sports athlete with knees flexed at roughly 15 degrees. Research shows that this slight bend improves your reaction time by 22% compared to a locked-knee position. It's about being ready to move instantly, not just standing still like a static target on the range.
How should my feet be positioned for a proper Isosceles stance?
Position your feet shoulder-width apart and square your hips directly toward the threat for a proper Isosceles shooting stance. Most professional instructors recommend a foot spread of 18 to 24 inches to maintain lateral stability. You don't want your feet perfectly parallel; instead, keep your dominant foot slightly back, perhaps 2 or 3 inches, to help drive into the gun. This creates a solid foundation for every shot you fire.
Does body armor change how I should stand when shooting?
Body armor fundamentally changes your stance by requiring you to square your torso to the target. Modern NIJ Level IV plates provide maximum protection when hit at a 90-degree angle. If you use a traditional bladed stance, you expose the vulnerable, unarmored gaps under your arms. Statistics from law enforcement engagements show that squaring up reduces the risk of side-entry projectile wounds by 40% during active firefights.