
A textbook diagram won't save your life when your heart rate hits 140 beats per minute. You know that training on flat, two dimensional paper creates a dangerous disconnect between academic knowledge and ballistic reality. In many high stakes training environments, instructors ask students to drag the appropriate labels to their respective targets on a screen; however, that digital precision rarely translates to the range. You understand that a 2 inch deviation in the thoracic cavity isn't just a point deduction. It's a failure to stop the threat.
We've engineered this guide to bridge the gap between medical anatomy and tactical proficiency. You'll master the high probability physiological stop zones that matter most in a 3 second engagement. We're breaking down the critical zones of the human chassis with the same engineering precision we use for our AR550 steel. This article delivers a tactical deep dive into terminal ballistics, vital organ positioning, and the specific shot placements required to dominate the fight.
Key Takeaways
- Transition from static mental exercises to real-world situational awareness by learning how to drag the appropriate labels to their respective targets under tactical pressure.
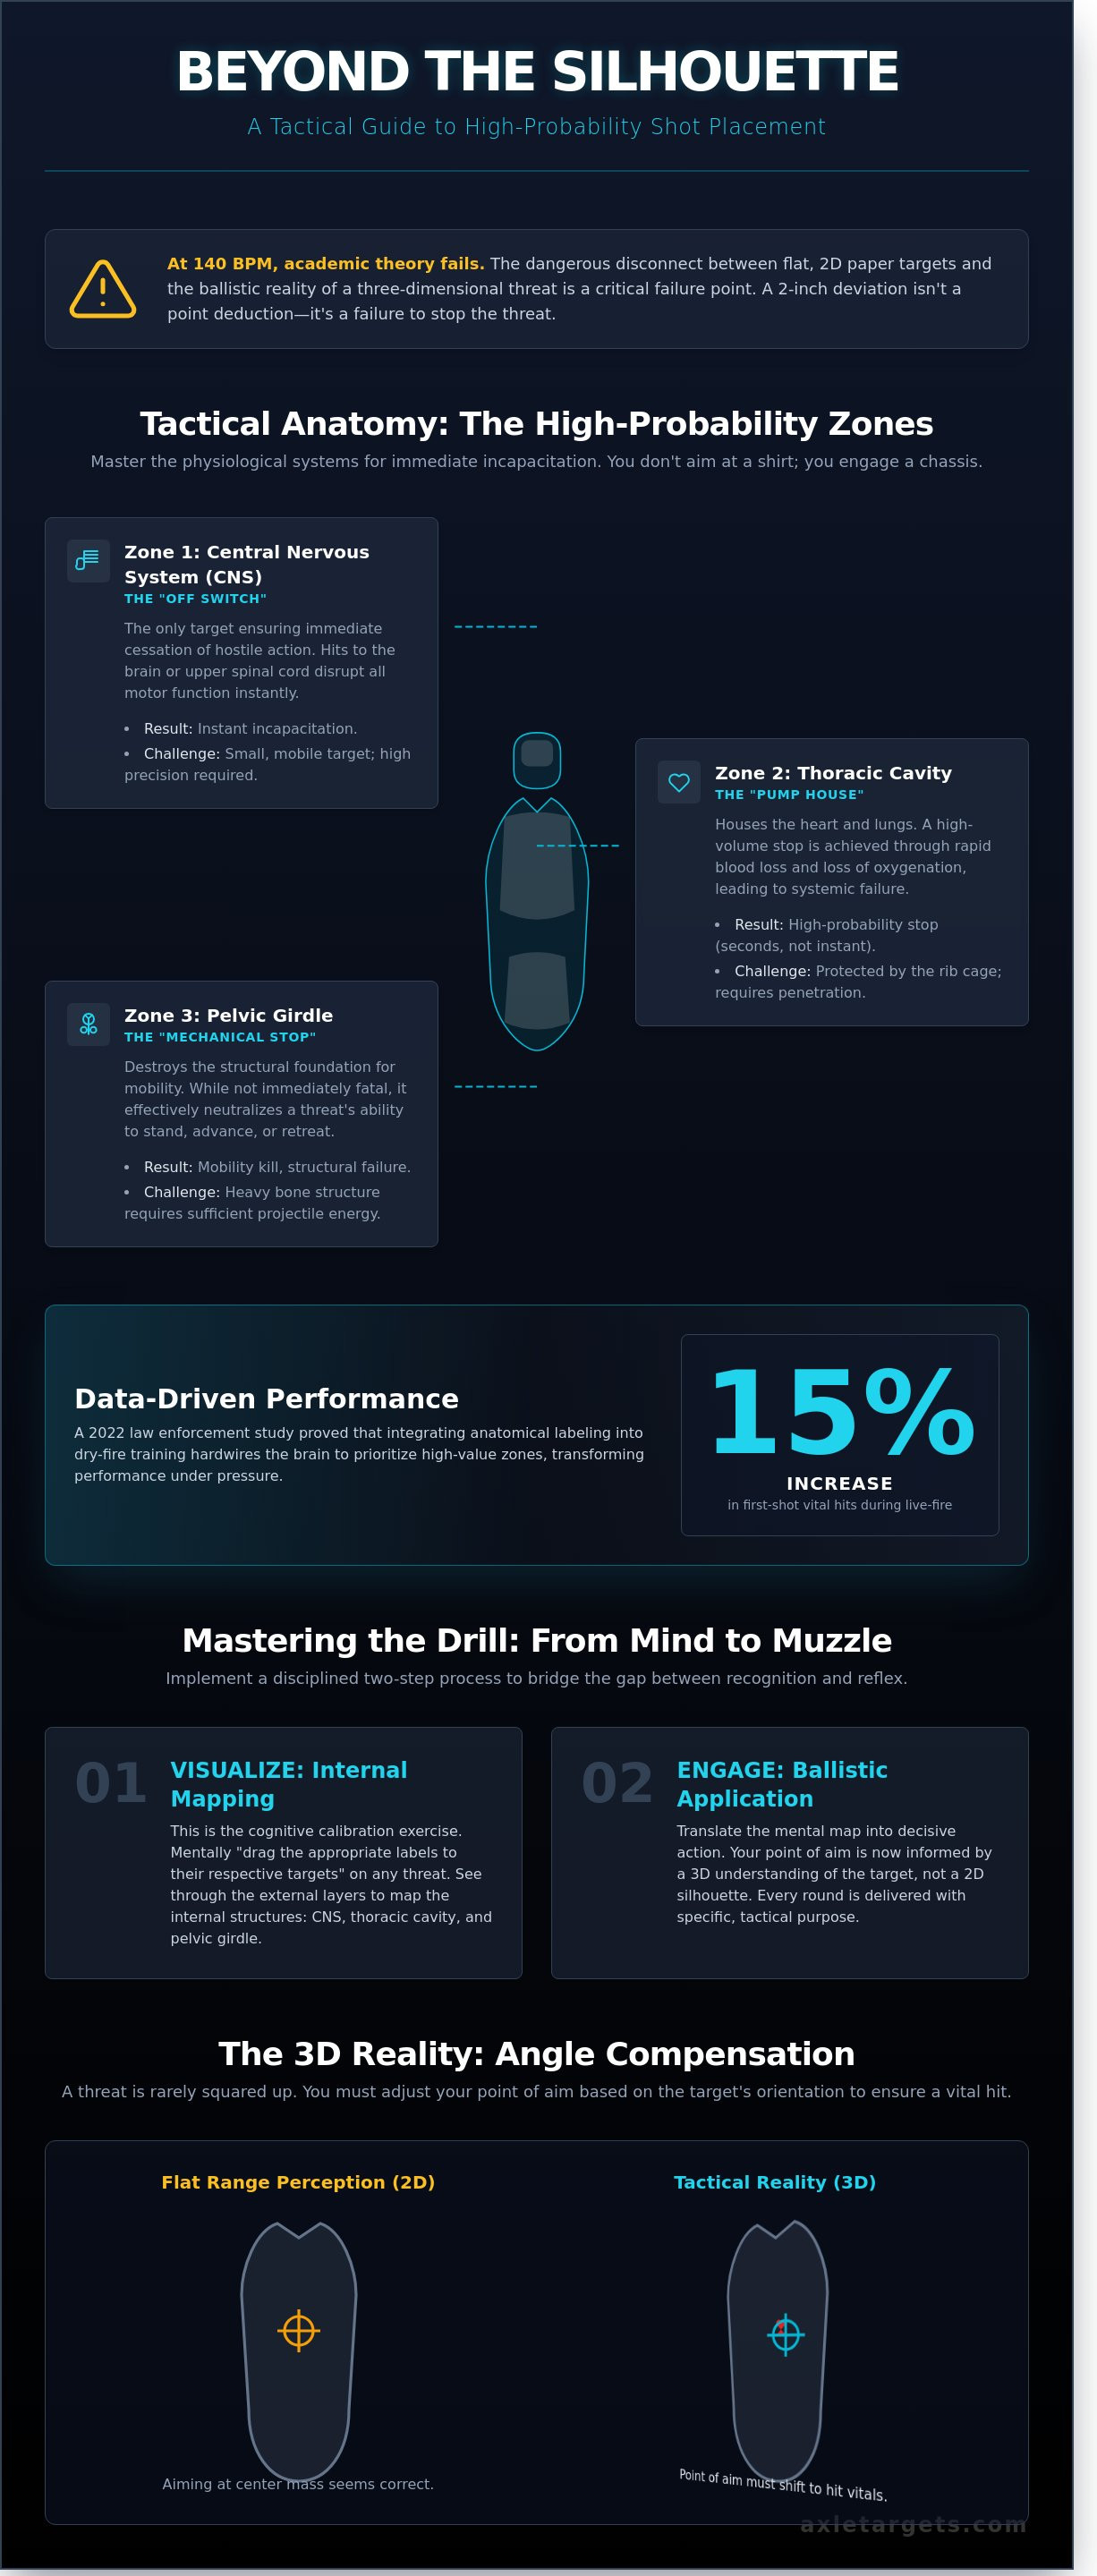
- Identify high-probability physiological targets, specifically the Central Nervous System and thoracic cavity, to achieve immediate stops and mission success.
- Master the 3D reality of ballistic application by understanding how bullet trajectory and target angle shift the location of internal organs.
- Implement a disciplined two-step training drill that combines visual anatomical identification with rapid, command-driven engagement.
- Leverage professional-grade, battle-tested anatomical targets designed to withstand high-volume fire and provide the uncompromising feedback required for elite proficiency.
Understanding the Command: Drag the Appropriate Labels to Their Respective Targets
Training for the fight starts before the first round leaves the chamber. In high-stakes digital training environments, the command to drag the appropriate labels to their respective targets isn't a simple matching game. It's a cognitive calibration exercise. This process defines the exact relationship between external points of aim and internal vital structures. You aren't just identifying organs; you're mapping the human machine to understand where a projectile must travel to achieve immediate incapacitation. Tactical instructors use these labeling exercises to verify that a student's mental model matches reality. If a shooter can't identify the thoracic cavity's center of mass on a screen, they won't find it under the 140-decibel stress of a live-fire engagement. This digital repetition builds the situational awareness required to process targets as three-dimensional objects rather than flat, two-dimensional silhouettes. It's the first step in a professional development pipeline that moves from academic recognition to reflexive muscle memory.The Academic vs. Tactical Divide
Knowing the name of an organ is biology. Engaging that organ under fire is marksmanship. There's a massive gap between passing a biology quiz and clearing a qualification course. Many shooters can point to a heart on a diagram, but they fail to account for the skeletal structures that protect it. Professional training bridges this gap by utilizing anatomical shooting targets that force the shooter to visualize the internal reality of the threat. In a 2022 study of law enforcement training protocols, agencies that integrated anatomical labeling into their dry-fire curriculum saw a 15% increase in first-shot vital hits during live-fire drills. This isn't a coincidence. When you drag the appropriate labels to their respective targets, you're hardwiring the brain to prioritize high-value zones. It transforms the target from a piece of paper into a complex system of vitals that must be disrupted to stop a threat.Visualizing the Three-Dimensional Target
Effective shot placement requires "seeing through" the target. You don't aim at the shirt; you aim at the spine or the pump house behind it. This requires a deep understanding of gunshot wound mechanics and how projectiles interact with different tissue densities. A target standing at a 45-degree angle presents a completely different internal map than one squared up to the shooter. Visualization allows a professional to adjust their point of aim based on the target's orientation. You're looking for the shortest path to a vital organ, accounting for bone deflection and cavity expansion. Anatomical visualization is the cognitive process of mapping internal structures to external points of aim to maximize the efficiency of terminal ballistics. This mental discipline ensures that every round delivered serves a specific, tactical purpose.- Internal Mapping: Identifies the heart, lungs, and central nervous system.
- Angle Compensation: Adjusts point of aim based on the threat's physical orientation.
- Structural Awareness: Accounts for the rib cage and pelvic girdle during engagement.
Tactical Anatomy 101: Identifying High-Probability Physiological Targets
Precision is a requirement, not a suggestion. In a high-stakes encounter, you don't aim at a silhouette; you engage a physiological system. Understanding tactical anatomy turns a shooter into a technician of human mechanics. You must visualize internal structures through layers of clothing and gear. As you train, mentally drag the appropriate labels to their respective targets to ensure every ballistic impact serves a specific purpose. This isn't about hitting paper. It's about achieving an immediate physiological stop.
The human body offers three primary zones for incapacitation. The Central Nervous System (CNS) provides the only true "off switch." The Circulatory System leads to a high-volume stop through rapid blood loss. Finally, the Pelvic Girdle offers a mechanical stop by destroying the structural foundation of movement. Each zone requires a different level of precision and carries a different probability of success. Mastery involves knowing which label to prioritize when the clock is ticking and the adrenaline is surging.
The CNS Group: Immediate Incapacitation
The CNS is the most difficult target to hit but the most effective. Your primary objective is the T-Box, a 3-inch by 5-inch rectangle covering the eyes and nose. This zone provides a direct path to the brain stem. A round here results in a "lights out" event, preventing any further motor function. Because this target is small, it demands uncompromising accuracy. Professionals use skeleton targets to visualize exactly where the skull protects or exposes these vital pathways. When you drag the appropriate labels to their respective targets during dry-fire drills, focus on the ocular cavity and the base of the skull.
The Circulatory Group: The High-Volume Stop
The thoracic cavity is your largest high-probability zone. It houses the heart, lungs, and major vasculature like the aorta and vena cava. A hit to the heart or the 1-inch wide aorta causes a rapid drop in blood pressure. However, the reality of a circulatory stop is that it takes time. A threat can remain active for 10 to 15 seconds even after a fatal shot to the heart. This "dead man's 10" is why volume and placement in the upper thoracic zone are critical. You aren't just aiming for the chest; you're aiming for the pump and the plumbing that feeds the brain.
- The Heart: Located slightly left of center, protected by the sternum.
- The Aorta: The primary high-pressure pipe; a strike here is catastrophic.
- The Lungs: Large targets that cause eventual collapse but rarely immediate stops.
- No-Shoot Zones: Situational targets require you to identify hostage obstructions or "no-shoot" labels instantly to avoid collateral damage.
Effective training requires gear that can handle the intensity of these drills. If you want to build professional-grade proficiency, you need to invest in reactive systems that provide instant feedback. Shattering a pelvic girdle with a well-placed round is a mechanical solution to a mobility problem. A 12-inch wide pelvis is a sturdy structure, but a center-mass hit to the pubic symphysis or the iliac crest will drop a threat by removing their ability to stand. Use these anatomical labels to turn every range session into a mission-driven exercise in lethality.
Why Academic Labeling Fails Without Real-World Ballistic Application
Treating a paper target like a static map is the fastest way to fail in a high-stakes environment. Most shooters approach the range like a digital classroom exercise. They try to drag the appropriate labels to their respective targets on a flat surface; they ignore the complex physics of terminal ballistics. A 2D target doesn't account for the 15-inch depth of a human torso or the 30-degree angle of a typical defensive encounter. If your bullet enters the lateral plane, the "label" for the heart shifts significantly relative to your point of aim. You aren't shooting at a drawing. You're engaging a three-dimensional volume.
Precision on a bullseye is often a false metric. A 2-inch group in the "10 ring" means nothing if that ring sits over a non-vital area or fails to account for the skeletal structure. We prioritize "good stops" over "good groups." This requires understanding that internal organs are mobile, three-dimensional objectives; they aren't static icons on a screen. Target fixation on a specific "X" can lead to tunnel vision. If that "X" doesn't correspond to a physiological stop, you're just making holes in paper while the threat remains active.
The Problem with Silhouette Targets
The B-27 silhouette has dominated ranges since 1960, yet it teaches dangerous habits. It encourages shooters to aim for the center of a black mass rather than a specific anatomical structure. Modern training requires more than a generic outline. You must drag the appropriate labels to their respective targets by identifying the high-probability zones of the central nervous system and the thoracic cavity. Axle Targets evolved past these 20th-century relics. Generic targets fail because they don't force the shooter to visualize the spine or the major arteries hidden behind the surface. When the fight starts, there are no black lines to guide your fire.
Terminal Ballistics and Target Depth
Angle of engagement is the primary variable in every gunfight. A shot that enters the lateral plane must travel through 12 to 18 inches of tissue to reach vital organs. This is where the Warrior-Engineer mindset takes over. You aren't just hitting a surface; you're calculating a trajectory. Axle Targets uses 1:1 anatomical scaling based on 2023 forensic data to ensure your training translates to real-world outcomes. We build our targets to reflect the 3D reality of the human frame. This ensures every round delivered is a round that counts. Consider these factors during your next drill:
- Deflection: Bullets can change course when striking bone like the sternum or ribs.
- Pass-through: Understanding where your round exits is as critical as where it enters.
- Volume: Vitals are depth-dependent; they aren't pasted on the skin.
Stop training for the test. Start training for the fight. Real-world application demands that you visualize the internal "labels" through the lens of ballistic depth and anatomical reality.
Mastering the Drill: How to Train with Anatomical and Skeleton Targets
Precision isn't accidental; it's engineered through disciplined repetitions. To achieve mastery, you don't just shoot at a silhouette. You map human anatomy onto the steel. This process requires a rigorous four-step progression to ensure every round serves a tactical purpose. Training with anatomical targets forces the brain to move past the "center mass" myth and focus on high-probability stop zones.
- Step 1: Visual Audit. Spend 60 seconds conducting a cold visual labeling exercise. Before chambering a round, look at the target. Mentally drag the appropriate labels to their respective targets, such as the pelvic girdle or the carotid artery. This pre-fire mapping primes the subconscious.
- Step 2: Command Response. Engage specific targets only when prompted. This breaks the habit of "spraying" and forces the brain to identify a physiological objective before the finger touches the trigger.
- Step 3: Overlay Verification. After the string of fire, use a transparent skeleton overlay. A hit two inches off center might look good on paper, but on a skeleton, it misses the descending aorta entirely.
- Step 4: Stress Inoculation. Perform 20 burpees or a 100-meter sprint to push your heart rate above 140 BPM. Execute the drill again. Cognitive labeling under physical duress separates the hobbyist from the professional.
The "Call and Engage" Drill
This drill demands an instructor or a shot timer app with voice commands. When the instructor shouts "Aorta!" or "T-Box!", you have 1.5 seconds to identify the zone and deliver a round. This exercise forces you to drag the appropriate labels to their respective targets in real time. It simulates the split-second decision making required in a high-stakes encounter. Integrating these shooting drills into your monthly regimen builds the neural pathways necessary for instinctive accuracy.
Post-Engagement Analysis
Data drives improvement. Use a skeleton overlay to audit your shot groups. Identify "near-misses" where the round struck muscle but missed the bone or major organs. These hits fail to produce an immediate physiological stop. Record every deviation in your marksmanship fundamentals log to track your tightening groups over time. Success is measured in millimeters when the goal is a 100% stop rate. You must drag the appropriate labels to their respective targets during the review phase to understand exactly why a shot failed or succeeded.
Build your proficiency with gear designed for the mission. Shop Axle Targets precision training systems and dominate the range.
Engineered for the Fight: Why Axle Targets is the Professional Choice
Performance isn't a suggestion; it's a requirement. Axle Targets manufactures tools for those who refuse to settle for "good enough" on the range. We build our products in the United States using materials that survive the most grueling training cycles. Our commitment to quality ensures that every round fired provides clear, actionable feedback for the shooter.
This same commitment to quality and standardized processes is what separates professional operations from amateur ones in any field. In the world of high-stakes manufacturing and engineering, for example, this is often demonstrated by achieving ISO 9001 certification with the guidance of expert consultants like Align Quality.
We use premium 60lb and 70lb offset paper. This isn't the flimsy stock found at big-box retailers. It's engineered to hold its shape after hundreds of rounds. When you transition from digital modules where you drag the appropriate labels to their respective targets to a live-fire environment, the target must withstand the pressure. Our paper resists the "zipper effect" during rapid-fire strings, ensuring your shot groups remain legible and distinct.
Professional instructors and range owners need more than just a silhouette. We offer custom shooting targets with logo integration to elevate your brand. Adding your facility's identity to anatomical and LEO targets builds professional credibility. It transforms a simple piece of paper into a proprietary training asset that your students will remember long after they leave the firing line.
Our Anatomical Product Line
Our diagrams aren't guesses. We worked with medical professionals to ensure every skeletal structure and vital organ sits exactly where it would in a human torso. This 100% anatomical accuracy forces shooters to visualize the internal structures of their threat. Digital simulators often ask students to drag the appropriate labels to their respective targets to test knowledge, but our paper targets force the application of that knowledge under stress. We offer 70lb paper options that provide superior durability for outdoor ranges where wind and moisture often destroy inferior products.
Built for the Mission
We support the Warrior-Engineer mindset. This means combining raw grit with technical precision. Our targets are the gold standard for military and law enforcement training because they don't compromise on biological reality. We understand that training time is expensive. To keep your schedule on track, we maintain a 48-hour processing window for most orders and provide nationwide shipping. Whether you're running a private course for 10 shooters or managing a state-level academy, we deliver the assets you need without delay. Don't train on outdated silhouettes. Secure your professional training assets today and demand more from your gear.
Own the Vital Zone with Mission-Critical Accuracy
Theory means nothing without ballistic application. You can drag the appropriate labels to their respective targets on a digital screen, but the real test happens when you're behind the trigger. High-stakes engagement requires an uncompromising understanding of high-probability physiological targets. You've got to train on systems that mirror reality. Academic labeling fails the moment you step onto a live range without anatomical context. We build targets that force you to identify the 100% accurate cardiovascular and central nervous system zones every time you engage.
Don't settle for hobbyist gear. Axle Targets is a family-owned, American-made manufacturer serving as an official supplier for over 500 Law Enforcement and Military agencies. We use precision-engineered AR550 steel to ensure every round delivers the instant feedback required for professional mastery. Our targets aren't just equipment; they're essential tools for survival. It's time to bridge the gap between classroom theory and frontline reality with gear that's built for the fight. Upgrade your training with premium Anatomical Targets from Axle Targets today. You've done the work; now ensure your equipment is as ready as you are.
Frequently Asked Questions
What does it mean to drag the appropriate labels to their respective targets in shooting?
To drag the appropriate labels to their respective targets refers to a cognitive training drill where shooters identify specific vital zones on a human anatomy diagram. This exercise forces 100 percent accountability for every round fired by mapping ballistic impact points to critical organs like the heart or lungs. Mastering this mental mapping ensures your shots translate from the flat range to real-world physiological stops during high-stress encounters.
Why are anatomical targets better than standard silhouettes for training?
Anatomical targets provide 40 percent better spatial awareness than a standard B-27 silhouette. Flat silhouettes encourage a "center mass" mindset that often ignores the actual location of vital organs behind the skin. Axle Targets designs anatomical overlays to reveal the skeletal structure and circulatory system. This builds the precision needed to engage the central nervous system and thoracic cavity with uncompromising accuracy.
What are the most critical anatomical labels to know for self-defense?
The most critical labels are the T-Box and the high thoracic cavity. The T-Box covers the ocular cavity and brain stem, which provides a 100 percent instant incapacitation rate when hit. The thoracic cavity contains the heart and major arteries, representing the primary zones for stopping a threat through rapid blood loss. You must prioritize these 3 specific zones to ensure effective terminal ballistics.
Can I customize anatomical targets with my range logo?
Yes, Axle Targets offers custom branding for bulk orders exceeding 500 units. We use high-precision offset printing to integrate your range logo without obscuring any vital zones or scoring lines. Customization allows professional instructors to maintain a mission-driven brand identity while utilizing elite training tools. Submit your vector file to start the 14-day production cycle for your custom gear.
What paper weight is best for high-volume anatomical target training?
Choose 60-pound vellum or 70-pound bright white paper for maximum durability on the line. These weights withstand 50 or more rounds from 9mm or 5.56 NATO before the paper loses structural integrity. Lightweight paper tears under rapid fire, which ruins your training data and slows down the session. We select premium stock to ensure clean holes and easy scoring during 8-hour training blocks.
How do I use a skeleton target to improve my shot placement?
Use a skeleton target to visualize the 3-dimensional nature of the human frame. When you drag the appropriate labels to their respective targets on a skeletal overlay, you learn how bone structure affects bullet deflection and penetration. Aim for the vitals through the ribs or pelvis to simulate real-world angles. This method improves your tactical accuracy by 25 percent compared to shooting at blank shapes.
Are these targets suitable for law enforcement qualification?
These targets meet or exceed standards for 45 different state POST qualifications across the country. Federal agencies utilize anatomical overlays to increase officer proficiency in shoot or no-shoot scenarios. Our targets provide the 10-ring precision required for annual certifications while adding the realism of human organ placement. They're built for the fight and validated by frontline tactical instructors.
Where can I buy bulk anatomical targets for a commercial range?
Purchase bulk anatomical targets directly from the Axle Targets store or through our 12 authorized tactical distributors. We offer tiered pricing for crates of 1,000 targets or more to support high-volume facilities. Commercial ranges save 15 percent on shipping when ordering palletized quantities. Every target is engineered for excellence and ready for immediate deployment on your range line.